Master Crispy Homemade Onion Rings: Better Than Restaurants
There's something uniquely satisfying about biting into a perfectly crispy, sweet, and savory onion ring. That golden-brown crust, the tender onion within, and the satisfying crunch that echoes with every bite – it's a culinary delight often reserved for restaurant menus. But what if we told you that achieving those elusive, "better than restaurant" onion rings is not only possible at home but surprisingly simple? Prepare to elevate your snack game, impress your guests, and perhaps even discover your new favorite way to enjoy this classic treat. Forget soggy, greasy imitations; we're about to unlock the secrets to crafting truly spectacular homemade onion rings that will have everyone asking for your recipe.
The Quest for Perfect Crispy Onion Rings: Why Homemade Reigns Supreme
Onion rings hold a special place in the pantheon of fried sides, often rivaling the popularity of even the fluffiest French fries and golden tater tots. The allure lies in their distinctive texture and flavor profile – a delicate sweetness from the onion balanced by a perfectly seasoned, crunchy coating. While dining out offers convenience, making onion rings at home provides an unparalleled level of freshness, control, and customization that truly sets them apart. You get to select the finest ingredients, ensuring the optimal flavor and texture that mass-produced versions simply can't match.
The history of onion rings is almost as rich as their flavor. Early iterations, such as those found in "The Art of Cookery Made Easy and Refined," even included cream, flour, and Parmesan cheese, showcasing their long-standing appeal. Over time, the concept evolved into the battered and fried rings we cherish today, with many variations emerging. However, for true connoisseurs, the addition of breadcrumbs, particularly panko, provides that ultimate, airy crunch and dense crust that elevates the experience beyond simple beer-battered or doughy rings. When you make them yourself, you control every step, guaranteeing a crispiness and flavor profile tailored exactly to your preference.
Imagine serving a platter of these golden beauties at your next gathering, a casual game day with friends, or simply as a fun appetizer to kick off a family meal. The aroma alone is enough to entice, and the taste will confirm that homemade truly triumphs. It's not just about replicating a restaurant dish; it's about surpassing it with care, quality, and a personal touch.
Essential Ingredients and Crafting Your Ultimate Onion Ring Batter
The foundation of any exceptional dish lies in its ingredients, and homemade onion rings are no exception. The star, of course, is the onion itself. For the best results, you'll want to reach for a yellow or sweet onion. These varieties possess a mild, sweet flavor that perfectly complements the rich batter and frying process. A single large onion can yield nearly 40 delicious rings, making this an economical and satisfying project.
Next, let's talk batter – the true secret weapon for achieving that coveted crunch. While simple batters are common, we're aiming for a superior texture that combines a creamy consistency with an incredibly crisp finish. Our go-to method employs a buttermilk-based batter paired with crispy panko breadcrumbs. The buttermilk isn't just for flavor; it actively works to tenderize and sweeten the onion slices, infusing them with an extra layer of deliciousness before they even hit the oil. For a deeper dive into this specific technique, be sure to read The Secret to Old-Fashioned Buttermilk Panko Onion Rings.
Here's what you'll need for this winning combination:
- For the Batter: All-purpose flour, baking powder (for lightness and crispiness), salt, an egg (for binding), and buttermilk. The baking powder creates tiny air bubbles, contributing to that airy, crunchy texture we crave.
- For the Coating: A blend of plain breadcrumbs and panko breadcrumbs. This duo is crucial; the plain breadcrumbs help create an even base, while the larger, flakier panko pieces fry into an incredibly crispy, dense crust. Don't forget to season your breadcrumbs generously with salt, black pepper, and garlic powder – this adds a vital layer of flavor directly to the exterior.
- For Frying: A large bottle of canola or vegetable oil. These oils have a high smoke point, making them ideal for deep-frying and ensuring a clean, neutral taste.
The careful selection and combination of these ingredients lay the groundwork for onion rings that truly transcend the ordinary. It's the thoughtful layering of flavors and textures, from the sweet onion to the tenderizing buttermilk and the ultimate panko crunch, that makes all the difference.
Step-by-Step Mastery: From Onion to Golden Perfection
Making crispy onion rings at home is a straightforward process when broken down into manageable steps. The key to success lies in preparation and meticulous execution. Let's walk through it:
1. Preparing Your Onions
Start by peeling your sweet or yellow onion. Slice it into rings of approximately 1/4 to 1/2 inch thickness. Uniformity is important here for even cooking. Once sliced, carefully separate the individual rings. For an even firmer texture, some chefs recommend chilling your separated onion rings in ice water for about 15-30 minutes before proceeding; just be sure to pat them thoroughly dry afterwards.
2. Setting Up Your Dredging Station
Efficiency is key. Arrange a baking sheet fitted with a wire rack nearby; this will be for resting your coated rings before frying and draining them afterwards. Now, set up three shallow bowls:
- Bowl 1 (Dry Dredge): Whisk together 1 cup of flour and 1 teaspoon of salt.
- Bowl 2 (Wet Batter): In a separate bowl, whisk together 1 egg and 1 cup of buttermilk. Then, gradually add about half of the flour mixture from Bowl 1 to this wet mixture, whisking until just combined into a smooth batter.
- Bowl 3 (Crispy Coating): In a third bowl, combine the plain breadcrumbs, panko breadcrumbs, 1 teaspoon salt, black pepper, and garlic powder. Mix well to ensure the seasonings are evenly distributed.
3. The Dredging Process
This is where the magic happens. Working with a few onion rings at a time to prevent clumping:
- Initial Flour Dredge: Lightly dredge each onion ring in Bowl 1 (plain flour mixture). This dry coating helps the wet batter adhere better. Place the floured rings on your wire rack.
- Buttermilk Batter Dip: Dip the floured onion rings into Bowl 2 (buttermilk batter), ensuring they are fully coated. Let any excess batter drip off briefly.
- Panko Press: Immediately transfer the battered rings to Bowl 3 (seasoned breadcrumbs). Gently press the onion rings into the breadcrumbs, flipping them to ensure a thick, even coating on all sides. This pressing action is crucial for creating that dense, crispy crust. Place the fully coated rings back onto your wire rack. Repeat this process until all your onion rings are breaded.
4. Frying Fundamentals: The Road to Golden Perfection
This is arguably the most critical step for achieving truly crispy onion rings. Heat your canola or vegetable oil in a heavy-bottomed pot or cast-iron skillet over medium heat. A depth of about 2-3 inches of oil is ideal for proper frying. The crucial element here is temperature control. Your oil needs to be consistently between 350-375°F (175-190°C). Use a reliable kitchen thermometer to monitor this closely. If the oil is too cool, your onion rings will absorb too much oil, becoming greasy and soggy. If it's too hot, the batter will burn before the onion inside has a chance to soften and cook through.
For a deep dive into mastering oil temperature and other frying techniques, explore Foolproof Frying: Get Perfectly Crispy Onion Rings Every Time.
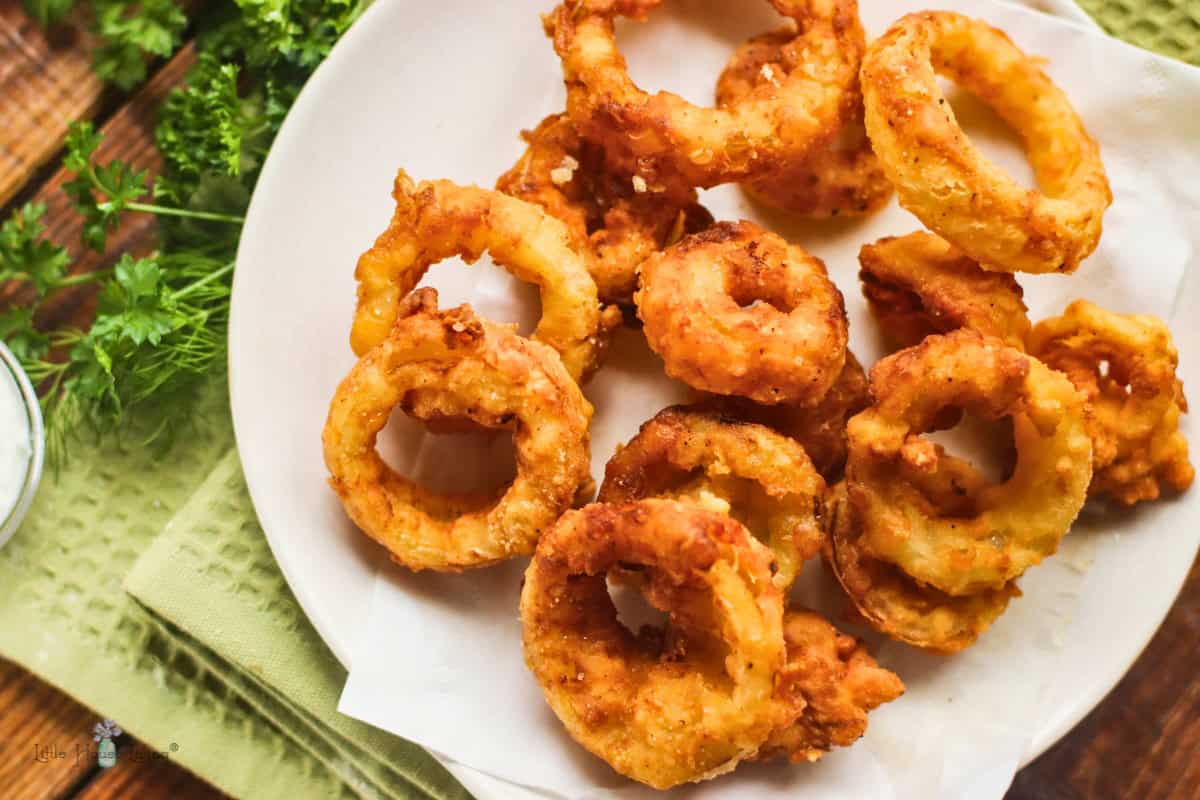
Fry your onion rings in small batches, taking care not to overcrowd the pan. Overcrowding significantly drops the oil temperature, leading to inconsistent results. Fry for about 2-4 minutes per batch, flipping occasionally, until they achieve a beautiful golden-brown color and are wonderfully crispy. Once cooked, remove the onion rings with a slotted spoon or spider, allowing excess oil to drain back into the pot. Transfer them to your prepared wire rack over the baking sheet (or a plate lined with paper towels) to drain further and cool slightly. A sprinkle of flaky sea salt immediately after frying can enhance the flavor even more. Serve hot and enjoy the fruits of your labor!
Serving Suggestions and The Versatility of Onion Rings
Once you've mastered the art of making crispy homemade onion rings, the possibilities for serving them are endless. These aren't just a side dish; they're a versatile culinary delight that can enhance almost any meal or stand proudly on their own. Their sweet, savory, and crunchy profile makes them an instant crowd-pleaser.
Classic pairings are always a hit. Imagine a towering burger, a slow-cooker pulled pork sandwich, or any smoky BBQ creation, all perfectly complemented by a generous side of your golden-brown rings. They make an excellent alternative to French fries and are fantastic alongside hot dogs or grilled chicken. For a lighter, yet equally satisfying touch, consider them as a crunchy, flavorful topper for salads – adding texture and a burst of savory sweetness that transforms a simple green salad into something special.
Beyond traditional accompaniments, onion rings are also an ideal appetizer for any gathering. Whether it's a casual football game with friends or a more formal dinner party, a platter of these crispy treats is sure to disappear quickly. And let's not forget the dipping sauces! While they are incredibly flavorful on their own, onion rings pair wonderfully with a variety of condiments. Classic ketchup is always a winner, but don't hesitate to experiment with gourmet options like a zesty aioli, creamy ranch dressing, a spicy sriracha mayo, or your own secret sauce creation. Their robust flavor and satisfying crunch make them adaptable to almost any dip you can dream up.
Conclusion
Creating crispy homemade onion rings that rival, or even surpass, your favorite restaurant versions is not just a dream – it's an achievable culinary reality. By selecting the right sweet onions, embracing the magic of a buttermilk and panko batter, and diligently controlling your oil temperature, you can unlock a world of irresistible crunch and sweet savory flavor. This journey from simple onion to golden perfection is quick, easy, and profoundly rewarding. So, next time you crave that iconic fried side, skip the takeout and embark on your own onion ring adventure. You'll not only enjoy a superior snack or side dish but also gain the immense satisfaction of knowing you created something truly delicious from scratch. Get ready to impress your taste buds and everyone around your table with these utterly addictive homemade onion rings!
